Plus: mud, crowds, drippy leaves, slick straw bales, tilting maze, sparse pumpkins, traffic, no hay rides (rain)
Today’s Monday Moments are brought to you by the Family Photo Chaos Company.
The above stats equal 5 adults and 5 children from 2-55 years old. A list of emotions, attitudes, and energy levels: shy, humorous, pre-teen, grumpy, hungry, tired, excited, crazy, silly, bossy, happy, ready to be done with it all.
This was THE fastest photo shoot. Ever.
Still, I’m smiling. Memories made, images captured, perfection avoided. The Christmas photo shall be selected and enjoyed.
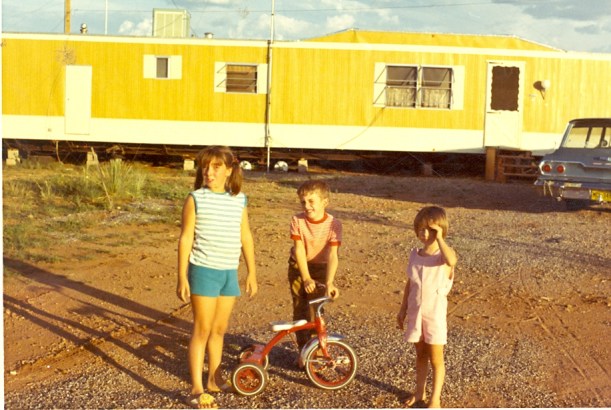
The opposite of sun-bleached, we were sun-drenched.
Long shadows, blinded eyes, rich dense colors.
Yes, this was us in the early 1970’s. I was most likely in 2nd grade, dressed for Arizona heat. My brother was in kindergarten, already pursuing his unique personality and sense of humor. Little sister must have been preschool-age, but back then going to preschool was not a thing families did.
Yes. That was how our yard was landscaped. Gravel, dust, scrappy weeds. The interesting parts were the critters and wildlife we discovered as we played and explored the desert environments. In this location alone, I remember collecting gallons of tadpoles after desert storms, and hunting horned toads, tarantulas, scorpions, snakes, spiders, jack rabbits, and those scary spider wasps. We also rescued a tortoise from the middle of the road and let him burrow around in the back yard. Thaddeus Humperdinck. That was his name. No idea why.
Yes. Windows open. The weather must not have been too drastically hot, and judging from the distant clouds, we might have recently enjoyed rain. We had a swamp cooler on top of the trailer and I remember lying on the floor beneath it during the hottest part of summer days with my coloring book and crayons, cooling off in the damp wind it created. But in this photo, the time of day was when the desert sun was kissing the horizon, ready to give us well-deserved shade and respite.
Yes. This was a very cool station wagon. Not only a wagon, but a magic vehicle capable of transporting us on weekend family treks to historical, dusty, engaging, scary, crowded, isolated, or deserted Arizona hot spots. Haha, “hot” spots. Soda pop bottles, white bread, bologna, and we were ready to roll. Up hill, down hill, across stretching southwest landscapes, stopping for rare shade trees and dusty gullies, drips of streams and gorges filled with flash floods. Life was an adventure. Include: dogs, kids, play pen, stroller, and avid interest.
Yes. A home on wheels. And we used those wheels to move the trailer several times over our life within the metal, possibly uninsulated, walls. We survived desert thunderstorms, lighting shows, freezing temperatures, snow storms, and heat hot enough to cook (insert your favorite food). Home it was. 3 bedrooms, 2 bathrooms, living room, dining room-kitchen, and utility room. Kids lived on the right end, parents on the left. We six (plus critters) crammed a magnificent amount of life into that gorgeous tenement on wheels.
I loved living in the desert, back when heat didn’t bother me and I spent all my days outside, digging in the dirt, catching insects and reptiles, chasing kids in the ‘neighborhood,’ and making up daring adventure stories while riding horseback with my similarly minded friends. The nostalgia of childhood paints beautiful masterpieces in my mind, blotting the difficult times (were there any?) and adding exquisite details to enhance my thankfulness to God for a good, excellent, childhood.
What about you? Which photo takes you back to your childhood?
This collage of colorful fruits and vegetables just screamed, “TAKE my picture!”
So I did. And then I cooked them all. That’s what they get for drawing attention to their beauty. A healthy diet is a colorful diet. So to this food art, I added a few more things to make curry noodle soup. Yummy!
Curry Zoodle Soup
2 T. vegetable oil
2 tsp. curry powder
1 tsp. ground turmeric
Saute’ over high heat, about 1 minute, stirring the whole time.
Gently add:
4 cups chicken broth
1-15 oz. can coconut milk
5-6 cups cubed butternut squash
1 sliced red pepper
1 sliced onion
Bring to boiling, reduce heat, and cook until squash is soft (about 15 minutes).
Add:
1 med. zucchini, zoodled
1 bag or half a plastic container of fresh spinach, stems removed
Juice of 1 lime
Heat 5 minutes. Stir well. Serve over cooked and shredded chicken breast.
This soup is so fragrant and tasty. You can also add any other favorite veggies (pea pods, peppers, broccoli, cauliflower). Good thing there’s plenty more for tomorrow!
A dear friend (college buddy and fellow Jello Molder) recently shared her lovely home and serene garden with several of our solidly middle-aged Jigglers. I could sit for hours beside this potted fountain, just resting. Listening. Dreaming.
Or wondering. Who lives beneath the leaves? Besides the dog drinking with noisy laps, who else visits for refreshment? Birds, squirrels, cats, frogs? Do bees bumble along the edges and butterflies dance above the leaves? Do raccoons dare to stop for a wash of dinner? Maybe spiders consider nearby locations to capture insects who venture in for damp moisture. I could imagine larger wildlife guests if the high fence disappeared. Do children press against the fence, hoping to spy the source of splashing? Are passing adults desperately wishing to sit and ease their minds beside the talking water?
A drink of serenity goes far to refresh a heart heavy with life.
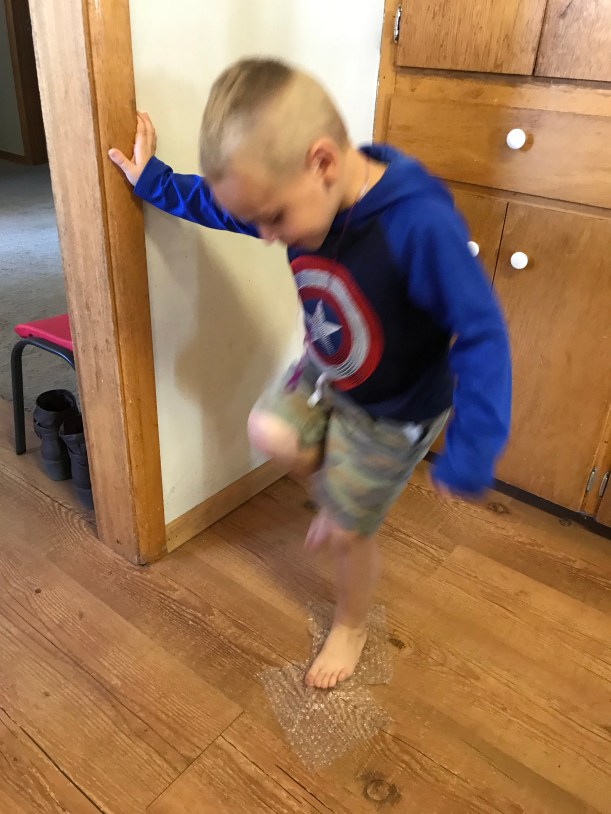
This post is NOT about wrapping preschoolers in bubble wrap. But it is about how much fun tots have popping bubbles.
Today during a sorting marathon, I discovered two small boxes filled with hand-sized rectangles of bubble wrap. Bubble wrap became the seed of creativity for my two young charges.
First, the fine motor skills used in attempting to pop the plastic bubbles brought intense concentration. Next came sound effects-boisterous shouts for each successful popping noise. And after introducing the ‘stomp-til-you-pop’ game while standing on the kitchen floor, squeals of joy and excitement filled the house.
30 minutes. That’s the minimum time they spent focused on small squares of bubble wrap. Moms, I was able to complete several tasks while supervising the giggly kiddos.
Mom tip: Get (save) bubble wrap!
Other activities to do with bubble wrap:
– use bubble wrap taped to a cardboard tube to make a paint roller
– add bubble wrap to cardboard strips to make bumpy roads for toy vehicles
– experiment with the protective properties of bubble wrap (drop an egg?)
– press bubble wrap in play dough or damp sand to make prints
– add bubble wrap to doll beds for mattresses (tape securely with duct tape)
– cut bubble wrap to fit inside a freezer gallon ziplock bag; seal with duct tape; let younger tots pop bubbles through the bag
– make bubble wrap shoes and walk around outside to see how well they work
CAUTION: Always supervise any play with plastic. Keep plastics and bubble wrap away from faces and mouths.
It might be noisy, but bubble wrap fun will be music to your ears.
I know walnuts are one of the healthiest nuts. And we should eat them every day. But I just can’t. It’s not that I don’t like them. I just like them in stuff. So I sneak them in my healthy dark chocolate cookies and muesli (which we eat nearly every day for breakfast), and put them on top of stuff. Mostly, my honey eats them as toppings (on yogurt, toast, crackers, nut mix). I’ve always been a hot fudge sundae without the nuts/cherry/whipped topping kind of girl. Just give me good old vanilla ice cream with plenty of hot fudge.
This recipe really helps me eat a daily snack of heart-healthy walnuts. Maybe they are not as good for you due to the small amount of sweetener, but they are not healthy for me if I DON’T eat them at all. Wink, wink.
Spiced Walnuts
Heat oven to 300 degrees. Put parchment paper on cookie sheet.
In bowl, whip:
1 egg
1 T. cinnamon (we love cinnamon, another good-for-you spice, so I tend to go heavy-handed on how much I put in)
1/2 tsp. cayenne (more if you want some bite)
1 T. maple syrup (the real stuff)
2 T. (or so) brown sugar
Add and stir well to coat:
5 cups walnut halves
Spread on parchment paper and bake 20 minutes. Stir. Bake an additional 5-10 minutes until dry. Cool. Break apart and store in covered container.
Not THE Jimmy Hoffa, but my own skin-less, flesh-less version.
One quarter during my junior year of college at Western Washington University, I had the BEST science course! I loved that class. We determined our own grades by the project choices and number of selections we made on a preset list of assignments. Since I was always aiming for top grades, I made high marks my goal.
The final choice (between getting an A or a B) was removing the flesh from a small rodent to expose the skeleton. Actually, there was a second choice, but I don’t remember what it was. I spent many intense moments in consideration as I walked to and fro across campus. Choice A or B? I just had to do that final project to push myself to an A.
As I was wavering on how to get a rodent (rat or mouse) and how I was ever going to ‘kill’ it in order to dissect the flesh/skin/fur from its’ skeleton, I practically stepped on a rat. I was racing to class, when BAM, there was a barely moving rat lying on the pavement right outside my dorm! It was up against Old Edens, a gorgeous brick, ivy-covered behemoth of a building. I think the poor thing fell off and brained itself. Barely breathing or moving. Four feet in the grave.
Should I or shouldn’t I??? Choice A? I had to choose A when the opportunity presented itself. Nearly late, I raced to my room, grabbed a plastic bag, ‘rescued’ the rodent from the cement, put it in the dorm freezer, and headed to class. I really don’t think it was going to come around, so slowly freezing to death seemed pretty humane to me.
Now I was in possession of a full-sized dead frozen rat-sicle. In. The. Dorm. Freezer. (Don’t tell anyone, I’m sure there were regulations against it.) Time to earn that A.
How to Make a Rat Skeleton Display
1. Borrow science tools and remove as much of the ‘not bones’ parts as possible. This was a bit tricky with the tail and tiny toes, not to mention the dull scapel.
2. Attach rat skeleton (in my case, Jimmy Hoffa) to a piece of balsam wood to hold it in one position. I used straight pins.
3. Take rat skeleton to a flesh-eating insect colony. I also had the choice of boiling off the flesh, but ew. If frozen rat in the freezer in my dorm was bad, the smell of cooking rat would have been much worse! Besides, the tiny bones would have fallen apart or dissolved.
4. Let rat skeleton spend a minimum of one month in the insect colony.
Research Tip: I have no idea which type of insects Jimmy really visited, but best guess is a colony of dermestid beetles. Which, according to this post, can pick a skeleton clean in one day. No idea why Jimmy had to stay away from home for a month.
5. So, Jimmy went on a little trip to the flesh-eating insect container. There Jimmy spent a month of so while hundreds, or thousands, of little bugs combed his bones, picking off and eating leftover bits my scapel refused to move. He was almost perfectly clean when I picked him up from the vacation in Bug-Land. After writing an eye-witness account of his travels, I presented Jimmy and his journal to my professor.
Ta-da! I was awarded an A for my work in the science course. And I got to keep Jimmy. Where he lived in a ziplock bag for years until I couldn’t think of anything else to do with him and tossed him out. Poor Jimmy.
There you have it! Should you want to de-flesh a rodent skeleton, just find a colony of those flesh-eating bugs.
What crazy projects did you complete during your educational years?
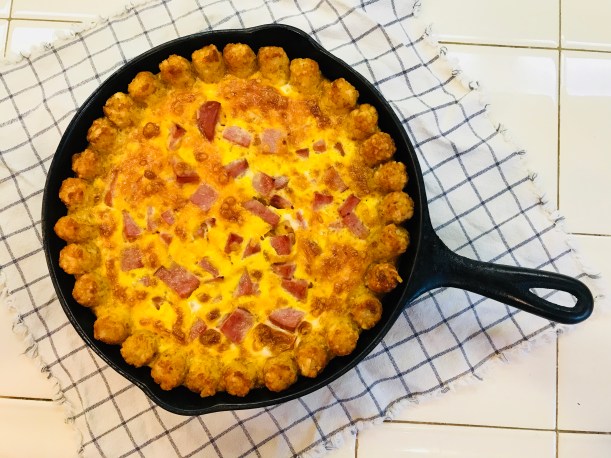
Compliments of my cousin, Melissa, we enjoyed her cast iron skillet breakfast casserole. So mouth-watering, fragrant, and tasty! I can’t wait to play with the recipe when I get home.
Cast Iron Breakfast Casserole
Ingredients:
1 package tater tots
1 dozen eggs
1 cup diced turkey ham (or your ham choice)
1 cup grated cheese
salt and pepper
butter
Directions:
1. Preheat oven to 375 degrees.
2. Generously butter inside of seasoned cast iron skillet.
3. Line bottom and edges with tater tots.
4. Sprinkle ham over tater tot crust.
5. In separate bowl, whisk eggs until well combined. Add salt and pepper to taste and mix. Pour over ham and crust. (Cayenne would be great, too!).
6. Sprinkle cheese on top.
7. Bake in oven. Start checking at 45 minutes by jiggling pan for movement or sticking fork in center for doneness. We like a crispy crust, so ours cooked for about 1 hour.
8. Remove from oven. It will continue to cook for a bit more. Slice and serve while warm. Delish!
Optional toppings: salsa or ketchup (for the youngers, not me), chopped green onions, sour cream, Tabasco. I’d like to experiment with green peppers, green chilis, spinach, broccoli, kale, and cherry tomatoes, though not all at once. Mmm.
Thanks, Melissa! I am inspired to re-season my cast iron skillet and whip up some breakfast casserole!