Love, Laughter, and Life

Adventures With a Book Lover


8 Comments

Free Yard Sales, Wood Scraps, and Homemade Table (Kevin’s Woodshop)

Welcome to another issue of Kevin’s Woodshop. In today’s story, we will hear how free yard sales, repurposed wood, and a little elbow grease contributed to this lovely weathered outdoor dining area.

FREE YARD SALES

Recently I visited “free yard sales” with my friend and fellow thrifter, Alyson. We love the thrill of the hunt. Free is an awesome word! My prize for the day is pictured above. Four solid metal framed wood outdoor chairs. Friends, that is what we call a SCORE. At this point in the “free yard saling,” I was cut off. No more stuff. Well. We only had her small car. Tetris in the car is the name of the game. And the limit to the thrifting.

I was so excited to haul these babies home. One of my favorite sights when I pull in the driveway after being away is to watch my honey’s face. My car is small, a Mazda four-door. BUT it works big! Like a truck. I call it my truck. I can get huge items in my little white truck. But not a gun safe. That is a hard limit. That’s a different story, but we did try.

I follow my husband’s eyes as I back around so we can unload my haul. Heh-heh. It’s almost more fun than scoring the “treasure” from yard sales or thrift shops.

He shakes his head. In wonder, I’m sure, amazed at how thrifty I am.

And proceeds to help me figure out how to reverse the process of filling my little “truck” with stuff. What. A. Guy.

REPURPOSED WOOD

We’ve been weathering our deck wood for a few years, always considering when it would be done to our satisfaction and what project required the updating of the deck so we could use the old wood.

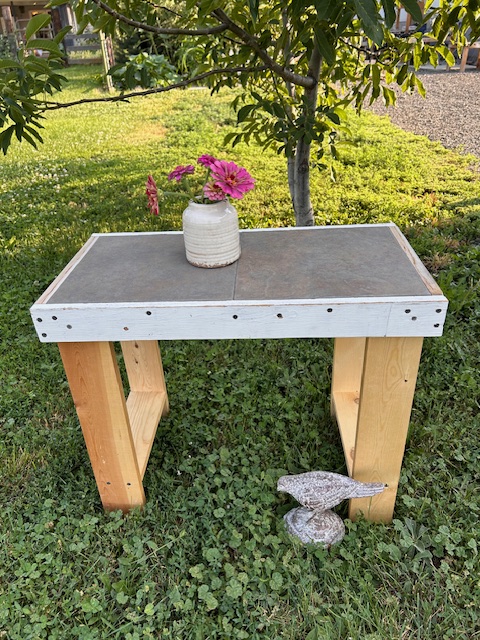
Ta-dah! A taller patio table was needed to match the lovely free yard sale chairs. Time to rip off the deck wood.

Perfectly aged to that gray beachy tone. Some people work in clay, watercolor, textiles. My honey works in wood scraps. The older the better. The wood imperfections create challenges, sure, but the results are unique and wonderful.
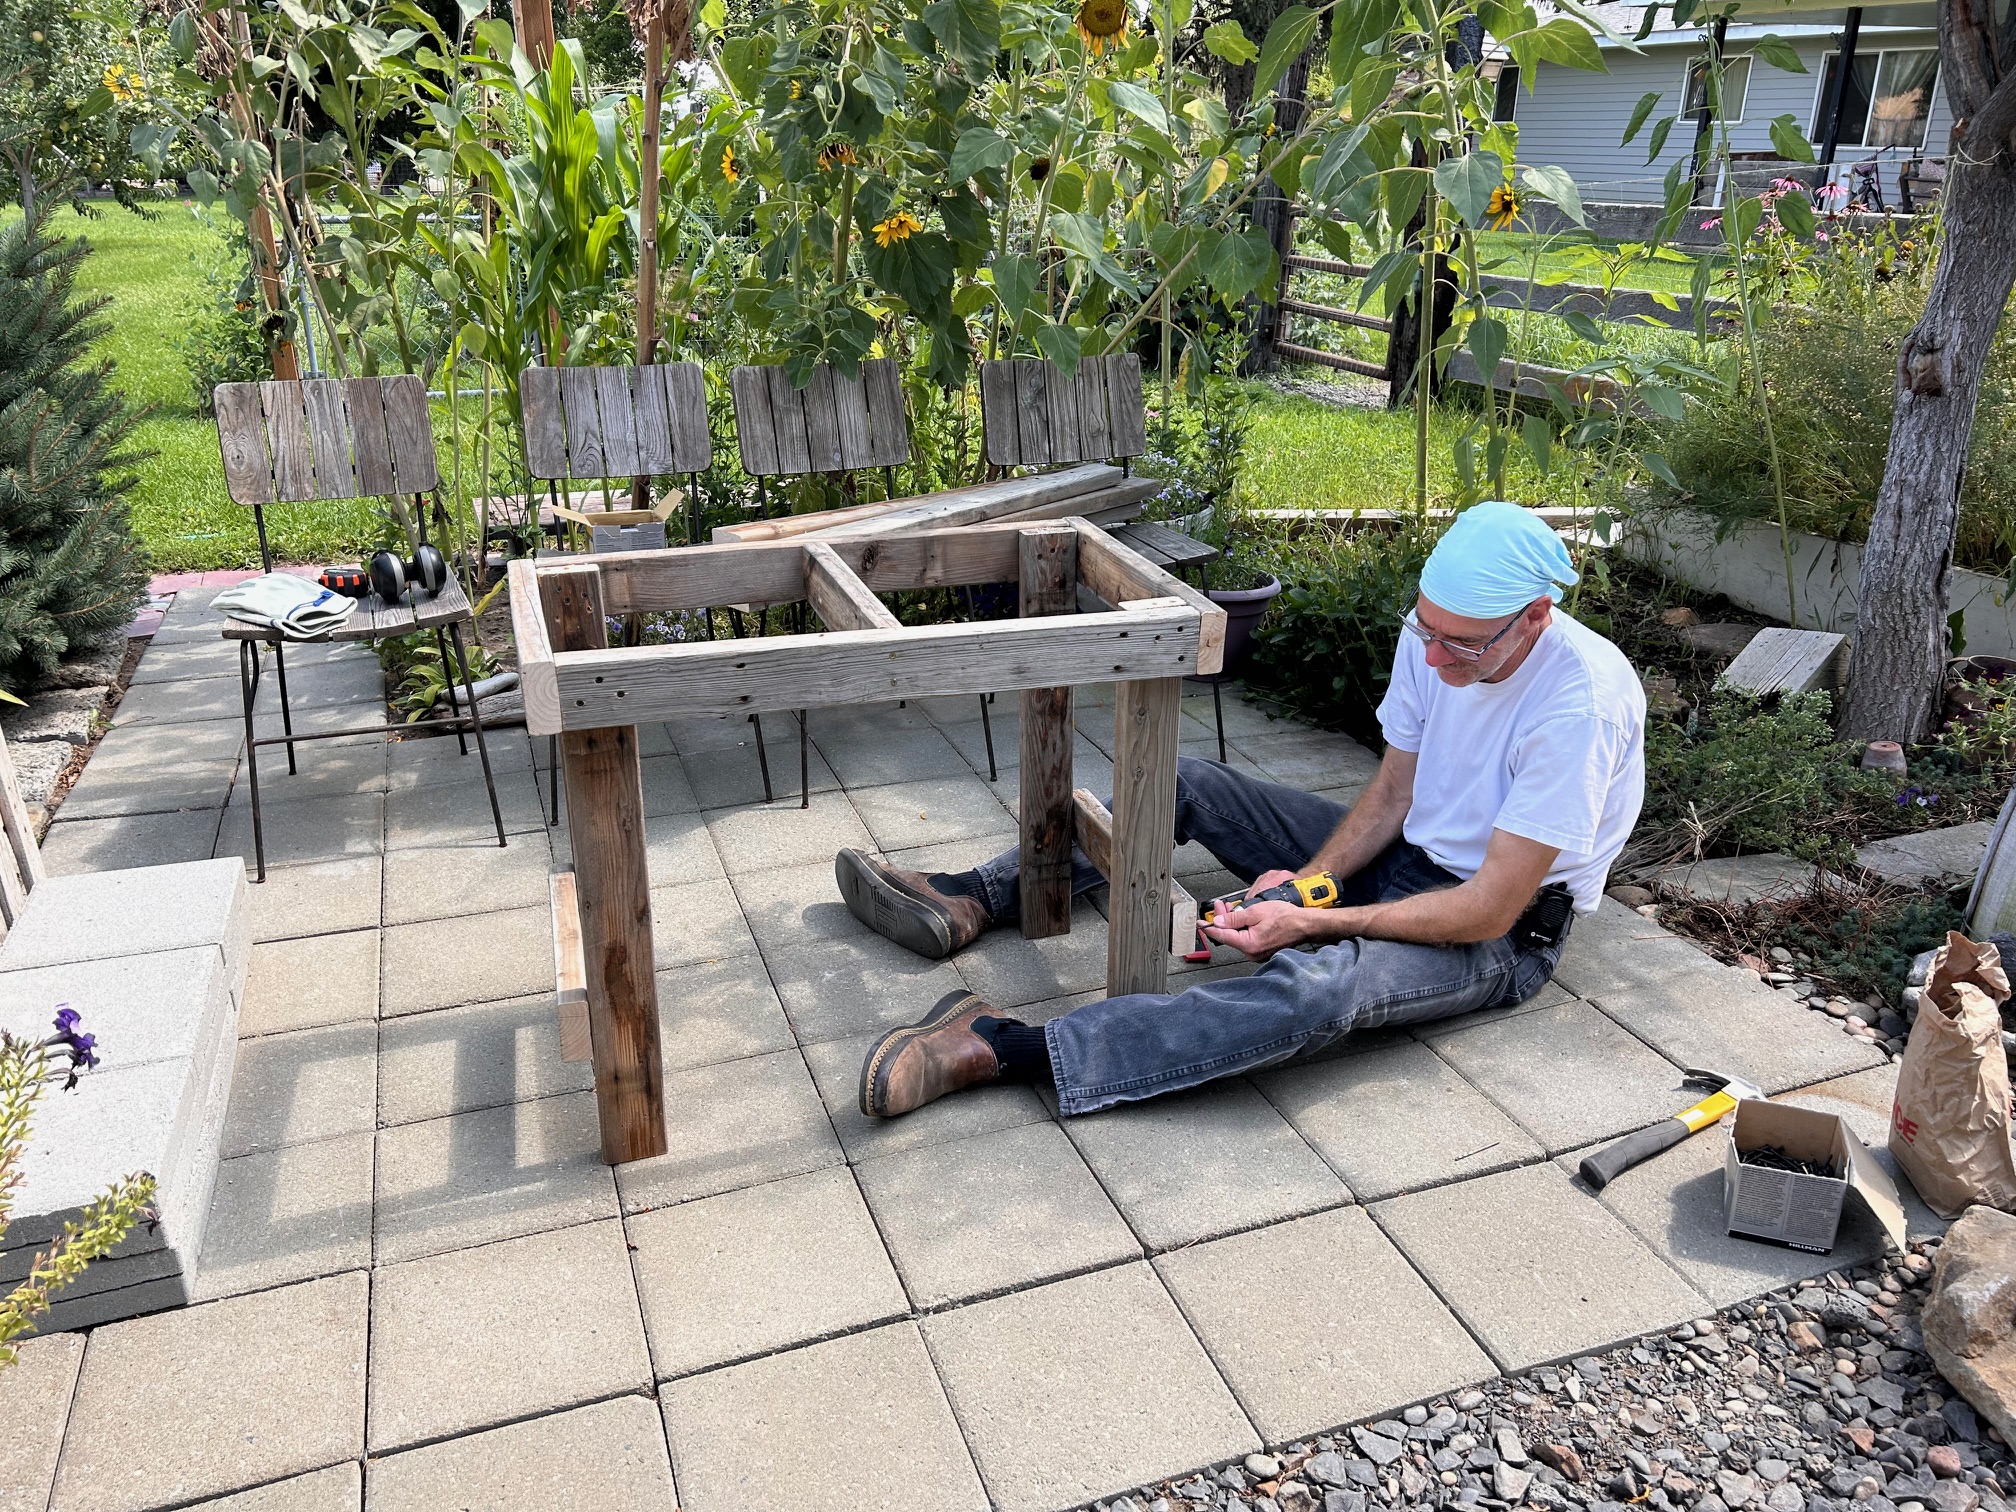
HOMEMADE TABLE

Woodworker Kev got right to it. As I mentioned, aged wood often requires ingenuity and rethinking. That was certainly true with this table project. Some pieces were warped, so the framing had to be redone. He is so good though. Just look at that beautiful table! My style for sure.

Now we can dine al fresco (as long as the weather holds). Though we have to first wipe off the sunflower shells and debris from our guest goldfinches, sparrows, and red-winged blackbirds. After that, it’s sit and chill time. Ahhhh.

And so concludes another issue of Kevin’s Woodshop. Readers, do you enjoy old wood? Free yard sales? Thrifting? Dining al fresco?

Do tell.


7 Comments

Homemade Tables Using Wood Scraps

My honey LOVES using up scrap wood to make garden tables. Mostly for me. 🙂 But he has gifted them to others.

Here are two of the newest projects. The small table used 2 slates from an old outdoor table and wood scraps from other projects. We always use the tables he makes outside and let them weather naturally. But this baby is inside Huckleberry Hutch, sitting perfectly beside my reading chair. Already topped with books. I might have to sneak it out sometimes to get some weathering going on.

Monet approves of this table. Actually, she approves of both tables.

The second table is also composed of wood scraps. It is solid! I love the long length and the design. This will stay outside where the elements will weather it to a lovely gray. We are using this one on the patio just outside the abode. Perfect!

I love the new additions to my Huckleberry and garden. Save those wood scraps and you can make awesome creations as well! Thanks, my love.


4 Comments

More Flower Hammering: Mixed Media and Greeting Cards

My pansies and Johnny-jump-ups are fading fast in this heat, so I took a few hours to hammer flowers. I also snuck in a red rose that was nearing the end, to surprising results!

I haven’t figured out how to keep them firmly in place once I start hammering. I think my table is not as sturdy as it should be, so the whole thing bounces. Whoops. But I am not hammering on my oak table! Bouncing it is.

They turned out so well! These are the only colors that are still flowering, despite my deadheading.

I did one page in my mixed media journal, combining a bunch of inks and “stuff.” And I experimented with card-sized cardstock, which turned out well, but it takes MANY flowers to fit on one of those (I did 5 card fronts). Hammering flowers is a workout! My honey was outside and thought someone in the neighborhood had their bass up too loud. LOL.

Just look at the surprising color I got from the red rose! I didn’t finish the page in my journal yet, but I was fascinated by the results.

The leaves did not leave any color at all. Too tough and thick.

I have some zinnias getting ready to bloom. I might experiment, but they are pretty thick flowers. Flower hammering. Experimenting is fun. Creating is FUN!

Until next time.


Leave a comment

Cherry Season = Clafoutis

Oh, yes! My son brought home fresh cherries and shared. Right off the tree. I love ripe cherries!

But I can only eat so many in one day and I didn’t want to waste them. What to do with the rest?

Clafoutis! Just in time I found this easy clafoutis recipe. Custardy, yummy, and filled with lots of cherries. Mmmm.

What is your favorite cherry recipe?

I still have some cherries left.


8 Comments

Flower Hammering & Mixed Media

Here is what happened in round 2 of flower hammering. I tell you, pansies make great prints! I don’t have much else of substance blooming yet in the garden, but I’ll keep experimenting as the season goes along.

This is what the cover paper looks like after hammering.

I tried hammering this batch of flowers on paper I’d already added color to. It turned out very nice by the end, and the flower prints give great texture. But I was a bit disappointed that the prints did not turn out as well as I had hoped. At least the yellow/orange ones did not. You can barely see the stem I tried, and darker bits where I added leaves.

The poor smashed flowers.

Here is try number 2. You can see where the prints on the previous page soaked through, which is cool. There is some beneath my arranged flowers as well. The bleed through is at least 2 pages worth. This page is all white except for some bleed through. I crammed the flowers, leaves, and stem with the hope of getting plenty of color.

This is how the back of the cover sheet looks after hammering. Things tend to move around a bit. I start out with the cover paper straight, but by the end, it’s all twisted. It’s hard to hold it still and not hammer your fingers!

Oooooh, yes! This is where I’m getting results. Just look at those pretty pansy faces on the white background! You have to gently peel off the petals, or in some cases, just let them dry and rub them off. Bonus: The cover page also has wonderful colors! I’m saving that for another project.

I LOVE this! I haven’t done anything else with this flower hammering page, but the ideas are brewing. Growing? Smashing? ;0

I did go back to the green background page and finished that mixed media project. I LOVE how it turned out! This is one of my favorites so far. The smashed flowers really add texture and the greens tie in so nicely. I saw another creator (several actually) who added circles to their art. So I played with some gold glitter acrylic paint. Wow! Perfect touch. You can see the other materials I used on this page.

Et voila! Stamp pads, rubber stamps, hammered flowers, chalks, washi tape, acrylic paint, colored pencils. Plus a stick for painting and an empty tape-dispenser plastic disc for the circles.

Have you tried flower hammering? Or creating of any kind? What is your favorite trick?


2 Comments

Now what?

I have these great ideas, inspirations, kernels of dreams. If possible, I jump on them right then, or at least scribble down a note to remind me of the idea so I can (hopefully) look back later and recapture what I was thinking.

Like the beginning of this card idea I started on my carefully rinsed and dried teabag. The sepia tone is perfect for making a card. The leaves pop off the teabag. I love how it looks. But now what? What should I do next? How can I amplify the idea into something beautiful? I am currently stumped on this project, so it sits on the table, waiting.

It’s like that in the picture book world too. I have (what I think is) a great idea, an inspiration, a kernel of a story. A brilliant idea. I jot it down. My mind plays with it, seeking a path to follow, wandering from this to that. My ideas often come to me as a title, a play on words, an interesting character, or a wishful suggestion of a setting or event. And then what? What should I do next? I have file folders and notebooks full of ideas. Waiting.

The creative struggle is real. It’s time consuming. It’s messy. Just ask my honey. But should I let the challenges stop me? When I hit that block-that wall-should I stop? No. Maybe I need to see the wall as the opportunity to take a deep breath, let my mind wander, do something else. Perhaps the wall is just a good resting spot to dream, pray, and let the “now what?” follow its course.


4 Comments

Let’s Talk Hobbies

Hey, friends. If you’ve been checking out my blog for any length of time, you may know a few of my hobbies. Gardening. Photography. Books. Reading. Cats. Tote bags. Grands (though they are not this far down the actual list, were I naming things in order of importance). Bible. More books. Art. Chocolate. Travel. Exploring. Seahawks. Oh, wait. I don’t post about the Hawks. But I LOVE watching them. (And it’s a LONG time until football season.) RV living. Hiking. Heart rocks. Beach time. Food. Thrifting. Reading. And books.

Let’s not forget-rubber stamping-the topic of this post.

Last year was an anomaly for rubber stamping. Because of surgeries (2), planning for and enjoying a lovely trip to Europe, taking my grand to the beach when he turned 10 (a Nana tradition for the grands), work, writing, and so many other things, my rubber stamping time was cut to the quick. My stash of handmade greeting cards is in the red. My creative muscles did not get much exercise.

Friends, it’s already the middle of February! This year will probably go as fast as last year, but I hope to exercise those creative muscles much more in 2024. Time to get this hobby in shape!

To kick off the year, I spent a part of last Saturday making a huge mess with my stamping supplies. Those rubber stamping muscles are so rusty! It took me quite a bit to get going. And I have to admit, I create better in the company of fellow creatives-the stamping buddies. Hobbies with friends is best.

But I persevered. I managed to make 8 cards. The struggle was real!

We watched the Super Bowl. I continued my personal Super Bowl of stamping by creating as I watched the game. Ended up with another 20 cards. All one basic design, but I will count each one as a win. My honey uses my cards in his job as chaplain and celebrant. Due to lack of rubber stamping exercise last year, even HIS stash is super low!

I wasn’t going to make valentines. But then I was inspired with one more idea as I was playing with a set of stamps I recently found at a thrift store (see above list of hobbies: thrifting). For one, I’m so proud of myself for actually USING a new/old set! For two, I made 12 more cards!

The mess is real. It’s still spread hither and yon. All worth it.

What hobbies do you enjoy? Let’s hear about it. Maybe I will find a new hobby!


6 Comments

Rubber Stamping Christmas Cards Fun

I LOVE rubber stamping. This year was short on time to create, due to so many things. As December approached, I realized I needed to supplement my stash of Christmas cards. So, I dug out the embossing powder and hot gun (because I haven’t used them for quite some time, and I had IDEAS), some favorite (and a few new) rubber stamps, washi tape, colored pencils, and decorative papers.

Fun, fun, fun for me! Living in an RV, space is at a premium. I began by allowing myself just a few craft items to play with in the evening. Embossing pad, powder, and hot gun. Then next evening, OH, I need the cardstock, fun paper, and paper cutter.

After that, OH, I keep forgetting the washi tape and glitter tape. Don’t forget the colored pencils. And yes, a few more stamps to add sentiments inside and to the back of the cards. And that bag of paper scraps would be perfect to add to some of the cards!

LOL. By the end of the week, I had a bunch of new cards, but also several trips of supplies that needed to be returned to the Huckleberry Hutch and put away.

But it was worth it. Fun cards! Merry Christmas to all, and to all a good night!

What craft do you LOVE to do? Especially during the holidays?


2 Comments

Haiku Moment: too much

garden explosion

overzealous fruiting plants

can one say too much?

too much by Angie Quantrell

Yakima Valley tomato harvest


Leave a comment

Garden Joy

It is so true. The meme where one day, the zucchini is tiny but the next it is ginormous. I searched my garden 2-3 days before this day. Nothing. Maybe a tiny fingerling. One at the most. Then comes this day. BAM. Eight fully ready to eat zucchinis.

Also tomatoes, wax beans, and green beans. I wasn’t even planning on harvesting. But once I saw the zucchini, I knew I was overdue.

Lunch was this. So delicious. I would eat this every day if the tomatoes and rustic bread always tasted so good. A little butter, spicy brown mustard, tomato slices. Done.

And for dinner, we had a two-bean, fresh corn off the cob, red onion, cherry tomatoes, basil, olive oil, and balsamic salad. Yummy! Don’t you just love summer garden meals?

But I need some more recipe ideas for the beans. I can’t keep up with them. I give them away, eat a ton, freeze a few (not a great option since we live in the RV-storage space is at a premium). We’ve had stir fry, meat packets including beans, and potato bean onion ground turkey soup.

Ideas please! What is your favorite fresh green bean recipe?